
Jenkins is the mostly used opensource tool in the world, It’s Master slave architecture is great for scalability to do distributed builds.Master is responsible for configurations, scheduling jobs in slaves.
Slaves are Jenkins agents its used to execute jobs scheduled by the master.
Today we will see how to deploy Jenkins in Kubernetes cluster and provision slaves dynamically.
Requirements:
1.Kubernetes cluster
2.Git
My Infra details,
Kubernetes cluster: 1 Master, 1 node
Kubernetes version: v1.18.5
Step 1:
Create Jenkins Master image:
To deploy in kubernetes, we need Jenkins Master image and Slave images.
Note : Step 1 and 2 can be ignored if you use my below public images which I have uploaded to docker hub.
For Jenkins Master : devopsart1/jenkins-master:latest
For Jenkins Slave : devopsart1/jenkins-slave:latest
To build the images, Clone this below git repository in Kubernetes master server,
# git clone https://github.com/DevOpsArts/kubernetes-jenkins-dynamic-slaves.git
# cd kubernetes-jenkins-dynamic-slaves/jenkins-master-image
I have given all the required Jenkins plugins in plugin.txt file.
If you need to add any new plugin, you can modify it and build the image.
# docker build -t jenkins-master .
Once the build is successful, get the docker image id and push to DocketHub
# docker images
# docker tag registry.hub.docker.com/devopsart1/jenkins-master:latest
# docker push registry.hub.docker.com/devopsart1/jenkins-master:latest
Step 2:
Create Jenkins Slave image:
Build Jenkins Slave image and push to docker hub,
# cd kubernetes-jenkins-dynamic-slaves/jenkins-slave-image
# docker build -t jenkins-slave .
Once the build is successful, get the docker image id and push to DocketHub
# docker images
# docker tag 51a427249bb1 registry.hub.docker.com/devopsart1/jenkins-slave:latest
# docker push registry.hub.docker.com/devopsart1/jenkins-slave:latest
Now we have created two images for Jenkins.
Step 3:
Deploy Jenkins Master in Kubernetes cluster,
Clone the git repository in Kubernetes Master server,
# git clone https://github.com/DevOpsArts/kubernetes-jenkins-dynamic-slaves.git
# cd kubernetes-jenkins-dynamic-slaves/jenkins-k8s-deployment
In this location we have six yaml files for Jenkins,
1.namespace.yaml - It will create a namespace called "Jenkins" in Kubernetes Cluster.
2.storageClass.yaml - It will create a storage class name called "Standard" in Kubernetes Cluster.
3.jenkins-pv.yaml - It will create a Persistent volume in K8s Cluster.
4.jenkins-pvc.yaml - It will claim the Persistent volume from K8s Cluster.
5.jenkins.yaml - It will deploy the Jenkins Master in Kubernetes Cluster.
6.jenkins-svc.yaml - It will create a service to access Jenkins from Kubernetes Cluster.
We will execute all yaml one by one,
Creating namespace in Kubernetes cluster,
# kubectl apply -f namespace.yaml
# kubectl get namespaces

Creating StorageClass,
# kubectl apply -f storageClass.yaml
# kubectl get storageclass

Creating Persistent Volume,
Before executing Persistent Volume yaml, create a directory in all K8s cluster servers,
# mkdir /mnt/jenkins && chmod 777 /mnt/jenkins
# kubectl apply -f jenkins-pv.yaml
# kubectl get pv

Creating Persistent Volume Claims,
# kubectl apply -f jenkins-pvc.yaml
# kubectl get pvc -n jenkins

Deploy Jenkins Master in Kubernetes Cluster,
# kubectl apply -f jenkins.yaml
# kubectl get pods -n jenkins

Creating service for Jenkins,
# kubectl apply -f jenkins-svc.yaml
# kubectl get svc -n jenkins

Accessing Jenkins Console,
To access Jenkins Console, use the default NodePort number 30001 given in the service with Kubernetes IP.
Jenkins URL: http://kubernetes_IP:30001

Now we can access the Jenkins Console.
Step 5:
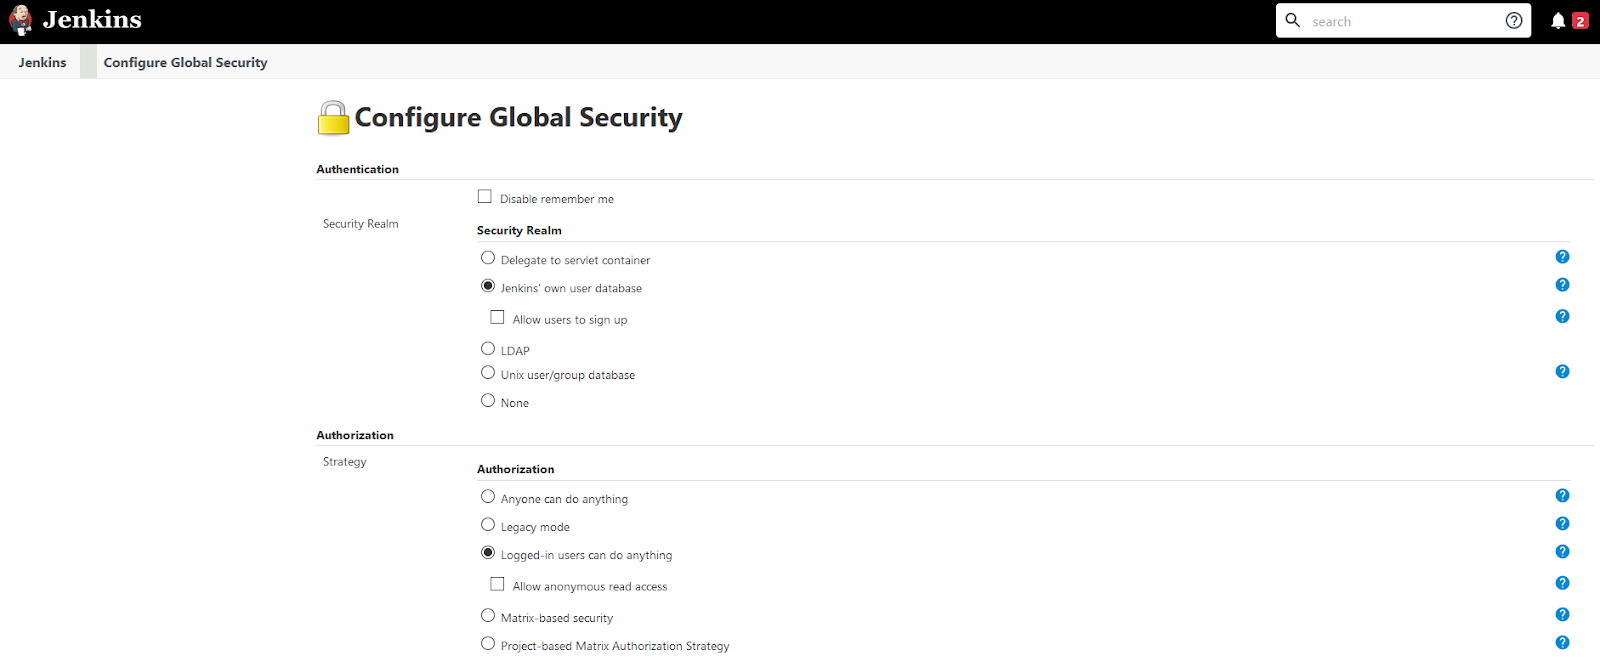
Enable security in Jenkins Console,
Currently Jenkins Console is accessible by anyone without credentials, Now we will restrict Jenkins by below steps.
Click Manage Jenkins > Configure Global Security > Security Realm choose "Jenkins own user database"
Next Configure Global Security > Strategy, choose "Logged-in users can do anything"
Save it.
Next it will ask to create First admin user and credentials.

Once entered the details then logout from Jenkins and login with new credentials,
Step 6:
Configure Jenkins Slave - Kubernetes,
Now we will configure Jenkins Slave from Jenkins Console.
Go to "Manage Jenkins" > Under "System Configuration" choose "manage Nodes and Clouds" > then choose "Configure Clouds"

Next click "Add a new cloud and Kubernetes". Now we need to enter Kubernetes details,
Here,
Kubernetes URL : get your K8s cluster IP and update there,
To get the details execute the below command and update in the place,
# kubectl cluster-info | grep master
Disable https certificate check : Do right mark if no need to check certificate.
Credentials : Add your Kubernetes service account token details by choosing "Secret Text" option in the Add Credentials section.
To create service account in K8s cluster check this below link,
https://www.devopsart.com/2020/07/install-kubernetes-dashboard-in.html
Jenkins URL : Enter the jenkins url/IP
Jenkins tunnel : if you are using NodePort, give the Jenkins service IP with port number 50000 in this place
# kubectl get svc -n jenkins

Final details will be like below image,

Step 7:
Configure Jenkins Slave - Pod Template,
Next we need to configure pods template in the same page which used in step 6.
Pod Template:
Click "Pod Template" and choose "Add Pod template" to add the required details,
Name : jenkins-slave
Namespace : jenkins
Labels : jenkins
Usage : use this node as much as possible
Container Template:
Next Add container details in container Template,
Under Container choose "Add Container"
Name : jnlp
Docker Image : devopsart1/jenkins-slave:latest
Command to run : make it as blank
Arguments to pass to the command : make it as blank

Volume:
In the same page, Click "Add Volume" and choose "Host Path Volume" then enter below details for both places,
Host path : /var/run/docker.sock
Mount path : /var/run/docker.sock

Now save the page.
Step 8:
Change Jenkins settings to run jobs in Slaves,
Choose "Manage Jenkins" > "Manage Nodes and Clouds" > click the Gear Icon in the Master.

And make the executors to "0" then save it.
Step 9:
Create Jenkins Job and verify,
Go to Jenkins home page > click "New Item" > enter a name , then choose "FreeStyle Project" and under build section give any bash command to execute and check it.Now Job is created, will build it and verify it is dynamically creating slave pod and run the build.
Once we click "Build now" wait for few minutes because first time it will download the image.
From Kubernetes cluster we can see the slave pod is creating , then running and terminating once the build is successful.

From Jenkins build console, we can see the same pod as Jenkins Agent,


Tested by creating one more job and triggered the build simultaneously and it ran successfully.


That's all we have successfully deployed Jenkins in Kubernetes cluster and configured Dynamic Slave provisioning for each Jenkins job and verified.
Post a Comment